Description
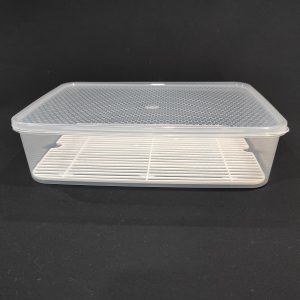
Our press is made from PVC so is very easy to keep clean and is compact to store. It also accommodates all the sizes of the moulds that we stock. It consists of a top plate and a bottom plate, four corner pillars which act as guides, and a ‘spacer’ that sits between your follower (mould pressing plate) and the top plate of the press for continual weight transference, plus a stainless-steel ratchet strap (so no rusting) which holds everything in place. No more midnight crashes in the kitchen – if you know you know! We have tweaked the design of the press, so this is Mark 2. The bottom plate now has a groove cut into the underneath where the ratchet strap sits and stays, allowing you to manipulate the top of the strap and ratchet without any slippage of the strap across the bottom plate. The hole that the pillars sit in on the bottom plate has been precision cut so when you push the pillars fully in to the blind hole, they are held firm. The pillars now stay upright whilst you drop in your cheese and assemble the rest of the press around it. We have also increased the length of the strap to 150 cm to accommodate higher stacks of weights.
So how does it work? Basically, by pressure applied through direct weight. This style of press exerts a continuous and even weight press over time, unlike a spring press which releases pressure as the load comes off it. Note that the press does not come with the mould or the weights pictured. The mould you require can be purchased as a separate item.
The top plate itself weighs 700g so alone will achieve a light press sufficient for Paneer or a Farmhouse cheese. More pressure is achieved by placing weights on top of the plate and holding them in place with the ratchet strap. The plate measures a generous 22cm by 22cm with a space of 15.3 cm x 15.3 cm between the rods to accommodate weights. Our 5kg home dumbbell weights comfortably fit onto the plate with a centimetre or so space to each rod as shown in the picture. During the initial stages of cheese pressing when the majority of your whey is expelled, your cheese curd will reduce in volume, and the plate will lower. You need to match this with a slight tightening of the strap until everything settles to an approximate terminal height, which tends to happen in the first half hour of pressing. The ratchet mechanism is made from high quality stainless steel and the strap from polypropylene, so they can stand up the acidic conditions of cheesemaking.
To assemble the press:
- To capture expelled whey set up your press on a sink drainer or on a tray or in a large baking pan. You may have to mop up expelled whey periodically.
- Place the middle of the ratchet strap in the groove of the bottom plate.
- Push the 4 pillars in the blind holes of the bottom plate, they snap into position.
- Sit your curd filled mould with follower in the middle of the bottom plate and place the ‘spacer’ on top of your follower.
- Slot the top plate over the four pillars and drop it onto the ‘spacer’.
- Add weights to the top plate as necessary and pull the ratchet strap over the top of them and tension lightly to hold. You may have to ‘ratchet’ the strap once or twice as whey is expelled quickly with your initial pressing.
- Once finish, rinse and wash all components of the press prior to drying and storage.
A note on cheese pressing weights or pressure:
Cheese recipes often provide advice on the pressure needed to press a cheese. Some recipes call for a specified weight on top of the cheese while others describe using a light, medium or heavy pressure with very little advice on what pressure this equates to and what weight will achieve it.
Another point missed is when a recipe requires a specified weight you may need to adjust that weight to suit the size of your cheese mould as weight alone does not represent pressure. There is a relationship between weight and area. To confuse things further pressure can be expressed as pounds per square inch (psi) in imperial units and kilograms per square centimetre (kg/cm²) in metric units. They are one and the same, just different units of expression based on local culture and practice.
In simple terms, if a mould has a large opening it will require more weight to achieve a certain pressure than a mould with a smaller opening. A good recipe will tell you what size of mould their instructions are based on but remember that if you increase or decrease the size of the recipe (i.e. if you change how much milk you use) and adjust the size of the mould you fill, be prepared to alter your pressing weights. The calculation is simple; weight divided by area will give you the pressure you will achieve. You do need to know how to calculate the area of a circle though which is as follows: Pi (π) which is 3.14 x diameter2 ÷ 4.
As an example: For a mould with a diameter of 10cm, its surface area would be 3.14 x 10² ÷ 4 = 78.5cm
So i have done this calculation for our moulds. We have 3 pressing moulds, and their surface areas are as follows:
800g mould = 108cm²
1.8kg mould = 200cm²
2.8kg mould = 300cm²
Then you need to know what pressure you are been asked to use. Many cheese making books quote commercial pressures that quite frankly are not easily achieved by the home cheese maker. We have found that much lower pressures work just fine for us. The table below gives our interpretation of commercial pressures with the home achievable equivalent that has been successful for us. They are a guide and you can decide where you sit on this continuem:
| Commercial Pressures | Home pressures | |||
| Pressure Level | In Imperial Units (psi) | In Metric Units (kg/cm2) | In Imperial Units (psi) | In Metric Units (kg/cm2) |
| Light | 5 to 10 | 0.35 to 0.7 | 1.4 | 0.1 |
| Medium | 10 to 20 | 0.7 to 1.4 | 2.8 | 0.2 |
| Heavy | 20 to 45 | 1.4 to 3.2 | 3.6 | 0.25 |
So now that you know the surface area of the opening of your cheese mould and the pressure you need to achieve as specified by your recipe, you can calculate how much weight you need to add. This is done by multiplying pressure by area.
Example (using our 800g mould and medium Home pressure): 0.2 x 108cm² = 21.6kg In practice i would use a 20kg weight as you also have the weight of the top pressing plate which is 700g, so a total weight of 20.7kg is close enough for me!
Example (using 800g and heavy Home pressure): 0.25 x 108cm² = 27kg The picture of our press is of an 800g mould loaded up with 25kg of free weights plus the weight of the spacer, top plate and ratchet which is my version of Heavy Pressure pressing a cheddar at terminal pressure.